Progress…upgrading the hot water service (a little earlier than expected).

A month or so ago I woke up to find a pool of water on my dining room table and the floor nearby. I looked up to see this…

Yep, pretty sure those brown stains aren't supposed to be on the ceiling.

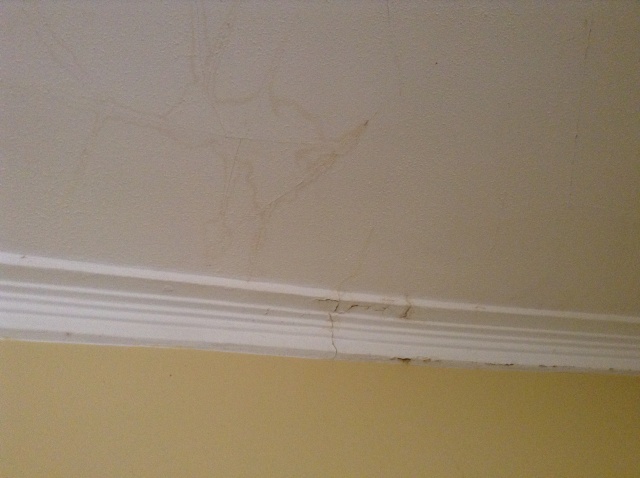
Yep, pretty sure those brown stains aren’t supposed to be on the ceiling.


Panicked, I ran out to the garage and grabbed the ladder so I could make a closer inspection of the ceiling. As I climbed the ladder, a few drops of water went by. Deifinitely not supposed to happen! I poked the brown stain on the cornice with my finger and it was basically a mushy mess. In fact I could push my finger right through it. Oh crap.

After an emergency phone call to dad (who knows everything) I called a plumber. He asked me if I’d been up into the roof and had a look. Ummm, no. Not going to happen. There’s spiders up there, hundreds of them. 30 minutes later he was up in my roof himself, and returned with bad news. The (very) old electric hot water service was cracked and the drip tray was rusted through. Get it fixed ASAP was his advice. Fastforward a couple of weeks later and I have this monstrosity attached to the wall of my house.image
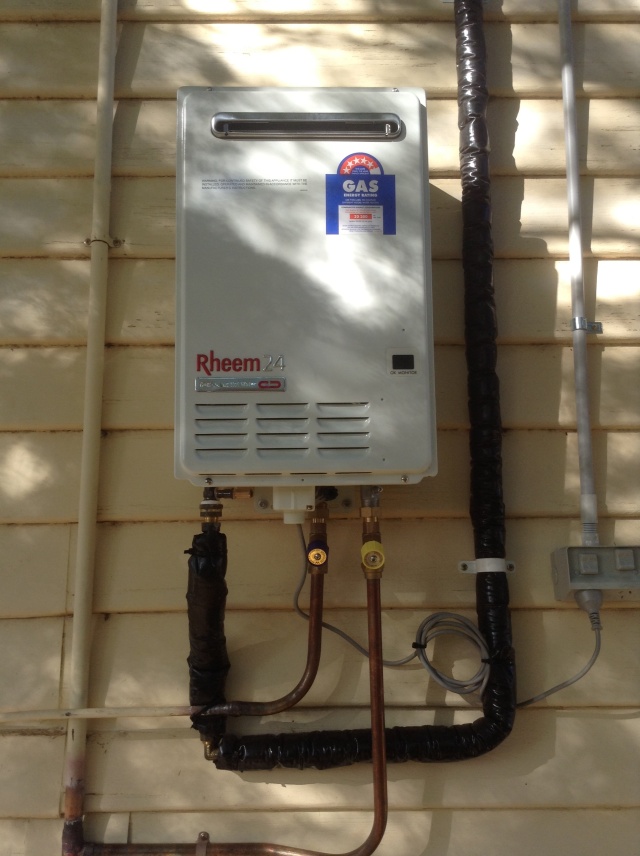
Definitely not pretty. But I’ll forgive it’s ugliness (and the fact it set me back close to $2000) because it is amazing. My hot water pressure is so much better now. And it runs on natural gas so I should start to see savings in my electricity bills. Also, I was planning to install one of these later (much later!) this year anyway. And it will no doubt add value to the house. Unfortunately, I now have to add ‘fix water damage on kitchen ceiling’ to my never ending to-do list. Sigh.

Progress…removing the old wallpaper (epic fail).

I have admitted defeat. After spending more than 2 hours stripping old wallpaper from one wall in the spare room, I finally came to the conclusion that the plaster underneath is beyond repair. So the wallpaper stripping has stopped and instead I’ll be looking into getting a professional in to replace the plaster, or more preferably DIY it myself. I’ve never done anything like that before. Can’t be too hard, surely?! Might need to get the boyfriend in to give me a hand.

In the meantime I’m moving onto some smaller projects – stripping layers of paint off the spare room sash window and prepping another door for painting. Just need to keep telling myself that every little bit I do is a step towards my goal of a dream (or at the very least, much improved) house!

This slideshow requires JavaScript.

Recent purchases…Aunty Cookie cushions

Once again, this is probably a misleading post title. I bought three cushions from Aunty Cookie some time last year, but I just couldn’t find the right spot for them in my house. I’d been coveting them for quite a while before I finally decided to take the plunge and buy them. From memory they were about $50 each. One of them (red with white cross) lives in the lounge room, while the other two have recently come out of storage and found a home on my back porch, as can be seen in the photo above. They bring a much needed dose of colour to my house! Check out Aunty Cookie’s website for lots of cute designs!

The other 3 items pictured above are still on my wish list!

All photos, excluding top image, from Aunty Cookie’s website.

Progress…removing old wallpaper.

This slideshow requires JavaScript.

I have developed a hatred for wallpaper overnight. My spare room is (badly) wallpapered almost 3/4 of the way up all around. It was always going to go, and last night I finally started the job of removing it.

I soon discovered that there was in fact 2 layers of wallpaper – oh joy. The top layer came off fairly easily, the bottom layer was tougher to remove. I searched the web and used the method of spraying the paper with warm water and dishwashing liquid, leaving it to soak in for about 15 minutes, then using a paint scraper to scrape the paper off.  A time consuming and fairly messy job! The plaster underneath isn’t perfect but is salvageable on most walls.  Some walls however are beyond repair! I think this is one of those jobs that I’ll just do a bit of each night after work until it’s finally finished.

The spare room – a work in progress!

Exterior paint colour inspiration

At the moment my old cottage is painted primarily in cream, with white and blue trim. I’m not a fan. In fact I would go so far as to say I despise cream paint. So eventually I’d love to repaint the old cottage in a colour palette more to my liking, such as those pictured above.

I’ve got to say I’m leaning towards the grey and white colour combination, and I just love the pop of yellow on the front door.  What do you think?

Recent purchases…the spare bed.

The spare bed

The spare bed. I should point out that I’ve done absolutely nothing to the spare room since I bought the house other than rip up the carpet and paint a door. Needs a lot of work!

The title of this post is perhaps a little misleading as I actually purchased this bed in December last year from a guy I worked with.  In a previous life he was a props buyer for TV and movies.  I bought this lovely old iron bed from him for $100 – a bargain in my opinion!  It’s very old (he thought maybe 100 years old) and comes with an interesting back story – it was used in the Ned Kelly movie starring Heath Ledger.  Heath Ledger lies on the bed in a scene in the movie and this creates a great talking point when friends and family come to stay with me.  I love it and it is now affectionately referred to as ‘Heath’s bed’!

Progress…I painted a door!

Now, you might be thinking painting a door is no big deal. But for me this is huge progress! You see, I took the door off it’s hinges approximately 2 years ago and sanded it a little. And then it just kind of sat in the spare room, waiting for me to get motivated to continue with the prep work. Waiting..waiting…waiting…

2 years later and I finally got the motivation to start working on it again. This included stripping off layers of old paint (primarily with a heat gun and scraper), filling in holes and scratches, sanding it all back to a smooth finish, and boiling up the old door hardware to remove layers of paint. Then it was a case of spray painting the old door handles a gloss black (3 thin and even coats), putting an all in one prep coat on the door, followed by 2 coats of Dulux Semi Gloss in Vivid White. End result? A huge improvement in my opinion! The doors are lovely old solid wood and I think are well worth the effort it’s taken to give them a new lease on life.


2 Years and Counting…

The Cottage

2 years. That’s how long I’ve owned and lived in the cottage at number 21. Well, actually, 2 years, 3 months and 1 day. I had such grand plans when I got my hands on the keys and moved into my first house. I’d have the whole place transformed within the year; it’s a tiny little cottage, how hard could it be?! Well, considering I’ve achieved very little in transforming the cottage, apparently it’s a lot harder than I thought!

Don’t get me wrong, I have made a few little changes around the place. But holding down a full-time job and renovating a house apparently don’t go hand in hand. Who would have thought?! So, to try and motivate me to get off my butt and get to work on the cottage I’ve decided to start this blog with the hope that publishing to-do-lists for the world to see and documenting updates will keep me going. We shall see. I also hope to use this blog to share things that I love – food, music, books, houses, interior design…basically anything I find interesting. Who knows, maybe no one will even read what I’m writing, but I still hope to use this blog as a place to put my thoughts in writing, regardless of whether anyone reads or not!